WHY:
This is one of my favorite projects to assign (and do)! Almost every student have voted this project as one of their favorites! It combines math and art, where math directly creates the artwork. Many students who never liked or enjoyed math have ended up spending countless hours enjoying math while doing this project. This is a must-do project if you're teaching graphing at any level!
MATH:
Math Concepts: All topics related to graphing every type of function including graphing inequalities.
ART:
Art Concepts: Soft and hard colors, 2D/3D design on flat surfaces, graphic design, modeling, depth
PBL:
Students will use math to create their artwork. Most artwork will range around 100-200 equations. The beauty about this project is that students won't stop until they are "satisfied" with their artwork. This project has the highest degree of autonomy, even if you narrow down the project to a particular theme (City Skyline, Dream House, etc).
If you have the funds, extend this project by having students create a tangible product. If you're teaching only linear functions, use colored emroidery threads on a black foam-cored board. Many art supply stores sell the foam-core with a grid on the backside. For other higher level of math, print a large color copy of the artwork to frame using mat boards with openings. (Click the MATERIALS tab for more details.)
MATERIALS:
While this project can be done without any costs, a final product takes it to the level where students will be proud to showcase their work. Often, when students know that their work will be up for display, they will work harder to ensure a higher-quality project.
For Projects Using Only Linear Functions:
- Multi-Colored Embroidery Thread. Cost: $10 per set of 24 skeins (8 yards/skein)
- Large-Eye Blunt Needles. Cost: $5 per pack of 9
- 20"x30" Black foamcore boards (with gridded backside.) Cost: $50-75 per 10 boards
- Alternate to foamcore: 1' x 2' x 1/4" Birch PlywoodCost: $20 per 4 boards
- Pre-Cut Mat Boards 16x20 with 11x14 Beveled Opening Cost: $40 per 20 boards
- 11x14 Color Printing Cost: $0.20 each
- Tape Adhesives Cost: $10 per 6-pack
- Notebooks/binders: For saving drafts and documenting work
- Computers: Use Desmos to graph the digital version of the project.
- Graph Paper: Use a standard sized graph paper throughout the project. Create and print your own here!
- Straight-edge: For hand-drawing some of the first drafts
- Colored Pens: For drafting a colored version of the artwork.
PART I - The Drawing(s) (~1 Week)
STUDENT'S DIRECTIONS:
Create a drawing using only linear functions. Use a straight edge for all lines. Choosing endpoints at integer coordinates will help make your math work later on easier. You must satisfy the following requirements in your artwork:
- At least 10 positively-sloped lines
- At least 10 negatively-sloped lines
- At least 10 horizontal lines
- At least 10 vertical lines
- At least 2 pairs of parallel lines
- At least 2 pairs of perpendicular lines
- Label all points using appropriate lettering (A-Z, then AA-AZ, then BA-BZ, etc.)
TEACHER'S GUIDE:
Decide whether you want to have a theme for your project. If this is your first time, a theme such as a "city skyline" or a "dream house" will make this project easier to carry out.
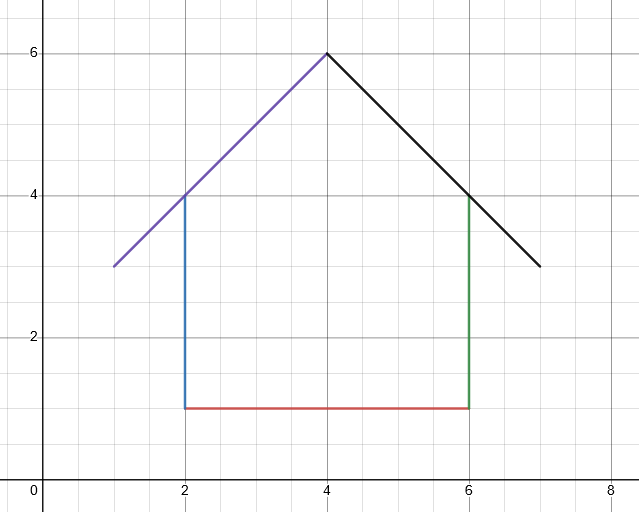
Choose a pedagogy for how you want to teach each concept, making sure to allow sufficient scaffolding for students. As you are teaching these concepts, show how they will directly apply to the project by using specific examples. For example, you may show students how to find the linear functions for the following simple house (which will give an example of a positive- and negative-sloped linear function, as well as a horizontal and vertical line):
Other things to consider standardizing for all students' work:
- Decide on a form for how you want the functions to be presented (standard, slope-intercept, etc.).
- Decide on a form for how you want the domain and range to be presented (set notation, interval notation, etc).
- Decide on the domain and range for your graph-paper.
PART II - The Math and the Art (~3 Weeks)
STUDENT'S DIRECTIONS:
For each line you drew in your artwork:
- Derive the correct equation of the line, writing it in slope-intercept form. (Example: The equation of the line that connects Point A and Point B would be written as: yAB = 3x - 3)
- Determine the domain for each line. For vertical lines, determine the range. Write them in set notation. (Example: The equation and domain of the line segment that connects Point A and Point B would be written as: yAB = 3x - 3 {4 < x < 8})
- Save all of your work, showing how you derived each equation. Example work: $$ A(2,3)\ \ B(4,9) $$ $$ m = \frac{9-3}{4-2} = \frac{6}{2} = 3 $$ $$ \begin{align} (2,3) \ \ y &= 3x + b \\ 3 &= 3(2) + b \\ 3 &= 6 + b \\ -3 &= b \\ y_{\scriptsize{AB}} &= 3x - 3 \end{align} $$
- For the 2 pairs of parallel lines and perpendicular lines, show how they are parallel or perpendicular (algebraically and graphically).
Type your final list of equations into a chart grouping each type of equations together (Positive-Sloped, Negative-Sloped, Horizontal, and Vertical). See posted examples.
TEACHER'S GUIDE:
Your individual lessons will depend on the level of mathematics. Make sure you scaffold well so your students can derive the correct equations that will model the lines in their drawing.
This is the core of the project, taking the longest time. Students should save all their work and present it in a very organized manner. You can decide how you would like your students to organize and present work. Look at some of the examples for ideas.
The best part about using Desmos to graph each line is that it saves you from checking every individual line to see if the student has done it correctly. When a line shows up on Desmos like the following image, students will automatically look at their work and fix it.
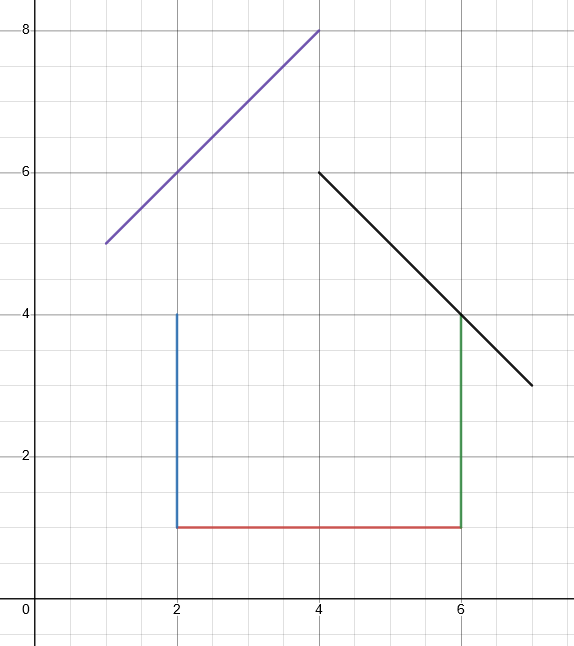
This is the best part about this project, because it teaches students to take responsibility for fixing their own mistakes. Unlike traditional homework where most students could care less.
PART III - The Showpiece
STUDENT'S DIRECTIONS:
After completing the digital version of your artwork, organizing all your work into tables, and putting all of your drafts together, it is now time to create the showpiece for this project.
- Create a "colored" version of your artwork by deciding on the colors you want to use for your lines. Print a copy of your artwork from Desmos and trace the lines, using colored markers/crayons/pens to highlight the lines.
- Using the grid on the back of the 20x30 inch black-core foamboard, draw with a pencil the "negative" version of your artwork. When you complete the threading, you'll have the "positive" version of your artwork on the other side.
- Using the large-eye blunt needle, punch holes into each of the points on your artwork. This creates the starter holes so that you can thread your artwork more easily later.
- Using the colored embroidery threads, and your colored drawing, create the image by "threading" your artwork. Try to use the same string for multiple lines (it doesn't matter what it looks like on the backside).
- Organize all your math work into a folder/binder including any hand-drawn drafts.
- Decide on a title for your artwork and write it on the back (including your name and date) of the artwork.
TEACHER'S GUIDE:
Again, the black foam board with embroidery threading should be used for projects utilizing only linear functions.
As an alternative for higher-level math projects, consider printing an 11x14 colored version of the students' Desmos artwork. Then use a mat board that is 16x20 with an 11x14 opening. Tape the color artwork to the back of the mat board with the artwork showing through the opening. Display all your students' artwork in your classroom or hallways. At the end of the year, display these in a gallery along with all your other projects for the end-of-the-year showcase!
GRADING RUBRIC
The Drawings (50 Points)
Points will be deducted for any of the following:
- Missing hand-drawn drafts
- Drafts not done on assigned graph paper
- Not using a straight-edge
- Missing labels on points
- Fewer than 10 horizontal lines
- Fewer than 10 vertical lines
- Fewer than 10 negatively-sloped lines
- Fewer than 10 positively-sloped lines
- Fewer than 2 pairs of parallel lines
- Fewer than 2 pairs of perpendicular lines
The Equation and The Art (100 Points)
Points will be deducted for any of the following:
- Missing computer-generated graph on Desmo (or is incomplete)
- Hand-drawn graph is different than Desmos artwork
- Missing/incomplete list of equations
- Equations are written in the wrong form or using the wrong notations
- Domain/Range are written in the wrong notation
- Equations are not categorized by type of lines
- Work is not organized in a table
- Work for all non-horizontal and non-vertical lines are missing/incomplete
The Showpiece (50 Points)
Points will be deducted for any of the following:
- Final showpiece is missing/incomplete
- Missing hand-drawn artwork in color
- Hand-drawn, digital, and showpiece do not match
- Threading of artwork is not secure
- Missing name, title, or date on artwork
- Missing name, title, or date in folder/binder of work
- Written/typed work is not in a folder or binder and is not organized.
TEACHER'S GUIDE:
Feel free to weigh the project (pointwise) how you see fit. In addition, add or take away anything in the rubric that you don't feel is appropriate for your class.
EXAMPLES
STUDENT'S DIRECTIONS:
Part of learning is to see what exemplary work looks like. Look through the following examples and get a feel for what I am expecting of you.
- Doreen (Grade 7 - Algebra - Linear Equations) Notebook & Showpiece: The X-Factor
- Jenny (Grade 7 - Algebra - Linear Equations) Notebook & Showpiece: Golden Gate
- Ronda (Grade 7 - Algebra - Linear Equation) Notebooks
- Lily (Grade 11 - Algebra II) Showpiece: San Diego Central Library
- Jean (Grade 7 - Pre-Calculus) Showpiece: Looking Out
- Eden (Grade 7 - Algebra II) Showpiece: From the Earth
- 2023 - GIA Examples (Digital and Boards)
- 2024 - GIA Examples (Digital and Boards)
TEACHER'S GUIDE:
Feel free to change any part of this project to suit your learning objectives. If you have ideas on how to expand on this project, please contact me and share your ideas! Have fun!